.I did it! I did it! I KNEW it would work---and it did! Using the pinwheel die that I have been raving about in my prior posts, I tweaked the putting together process and made them so they would move! First, I made myself dig into my "I love it and hate to use it!" stash of paper and picked out a piece. It's by Cosmo Cricut and it's called Early Bird: Cherry Pie. It's double-sided-cherries on one side and then a pretty teal, cream and red diamond design on the other. So---here's a step-by-step how to tutorial...I haven't quite gotten the camera/video part of the new laptop down yet so you'll have to settle for the old-fashioned way!
Things you need....
Pinwheel Die (see prior posts); Cutting tool (Big Shot, Cuttlebug, etc); One piece 12"x3" double-sided paper; Stick (I used a chop stick!); Wire (I used floral wire...); One round bead; one flat bead; ribbon to embellish; container to put them in; more ribbon to trim that; styrofoam; filler (if using a clear container); small piece of plain cardstock to stamp on; brad; ink pad; adhesive; small circle punch (think mine is 1"?), and a hand-held hole punch (with a hole bigger than the Crop-a-dile); scissors. Ok. So--first step is to cut 6 of the pinwheel die cuts and punch out one circle.
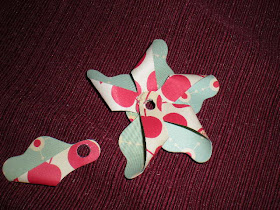
The next thing you want to do is adhere the pinwheel piece ends together one by one like so..
Then, using your hole punch, punch holes in the ends of the pinwheel pieces and in the center of the circle punch out. Should look like this:Next you are going to adhere the pinwheel pieces to the circle. You might want to use an adhesive that has a slower drying time so you can tweak their positions as you go around.
.
I cut a piece of floral wire about 6" or so---thread that through the round bead and give it a twist so it fits tight around it
Next you are going to add the pinwheel and then the flat bead behind that. This next step is the tricky but IMPORTANT part: you want to leave enough room between the beads and pinwheel so that it will move. If you get it too tight, it won't (obviously). Play around with it until you have enough space
Then you are going to wrap the ends of the wire around the stick. I wrapped one to the top, and then one to the bottom and scrunched them together when I was done wrapping. Again, you want to be sure you don't tighten it too tight or the pinwheel won't move! I tied a bow to two of the pinwheels and then stamped the sentiment on the plain cardstock and trimmed it out to attach it to the third. I measured it around the stick and tweaked it so I would know where my "folds" would be, punched a hole for the brad and added a little adhesive to the part going around the stick. Put it on the stick and attach the brad.
Finally I "recycled" one of the cute little ISLAND SKIN SATIONS SALT SCRUB jars! I cut pieces of styrofoam and stuffed them in, working around some paper basket filler to cover it as I went. I trimmed the ends of the chopsticks so my pinwheels would be at varied heights and Presto! A VERY CUTE (yeah, I may be a bit biased!) little decoration. My kitchen is done in red and white and I think this will look adorable sitting in my old-fashioned, much-loved Sellers Hoosier!
Now, all that said--I *may* probably assembled the pinwheel the hard way! I don't know if the assembly method listed on the blog site I ordered it from will allow it to move-or not. You would still need the beads as spacers--and the larger holes. That I do know! If you try her method vs. mine and they do move-please do tell me!!! Ok. So the day has gotten away from me somehow and NOTHING has been done on my to-do list. Oh well, there's always tomorrow, Scarlett! Lol. Until next time, happy stamping and scrapping! Blessings, Sharon


Can't wait to try this, Sharon! Thanks for posting your step-by-step instructions! They turned out ADORABLE!
ReplyDeleteHey Sharon! These are super cute. I love the cherry paper. Keep uo the good work.
ReplyDeleteKristin
Oh wow! This is awesome! :)
ReplyDeleteOh how gorgeous and fun. Thanks for sharing it with us at Catered Crop.
ReplyDelete