Sunday, September 28, 2014

A treat--AND a few tricks!

Long time, no time, no post!
Sorry!
Let's fix that now!

 
I wanted to get a head start
on the Halloween treats for the preschoolers
before life got crazier
and I got further behind.
I had perused Pinterest and other sites for hours...
and decided to fall back on this pattern
that I used last year for their back to school treats
only with a Halloween theme...
 
 
It is super easy, super cheap ( both important when doing 25+ teachers
and if I smoosh the bag a little, holds an M&M Fun Size bag of M&M's.
My go-to treat for them.


Now.
I did not create this--I cased it--and saw it on Pinterest the other night
and pinned it (I thought) as I wasn't sure I still had my pattern-
and then it wasn't there when I went looking for it.
I am sure I gave credit to the creator when I used it last fall---
so please check August or September 2013 for that.
I did-find my pattern (I had actually put it where it belonged...!)
and went to work.
One 8 1/2"x11" sheet makes two treat holders.
So cut your paper in half  so you have 8 1/2"x5 1/2" pieces.
Now take your Simply Scored board and place the 8 1/2" side along the top edge like so
 
 
and when you realize that you have lost all the little markers for the Score Board...
pull out some mini brads.
Open up on prong so that it will lay on the board and mark the score spot
while you slip the other prong into the hole and fold it back to secure it!
Instant replacement markers.
Score the 8 1/2" side at 1 3/4", 3 1/2", 5" and 6 3/4".
 
Now turn your paper so the 5 1/2" side is along the top and score at 1 1/2" and 4".


Once I have all my lines scored,
I like to line up the short ends
and punch the middle section close to the edge
and centered in the section
with SU's small oval punch.
 
This creates the hole for the handles.
 
 
Now you need to do some cutting...
the red lines on my diagram indicate which score lines you need to cut and how far...
 
 
A tip from the person who created this (and she had a video tutorial!)
was to have the scored lines in mountain position when you cut-
that way your scissors sit right in that groove nicely...
 
If you want to stamp on your project-
now is the time to do it!
I stamped on the backside of my box.
Remember that the FRONT and BACK of the box
will  be the two panels directly below the handles.
Ok. Time to assemble.
Fold along all the score lines.
Put a glue dot or some tape along the two full-sized flaps on either side of the handle.
You only need a single glue dot or a small strip of tape.
In my picture, that would be the flaps on the right-hand side.
That's all you need-the folds help hold it together-that one spot/strip of tape secures it!
 
Now,
hold the bottom of the treat holder in your dominant hand
and fold the two side panels up.
Fold the sides with the shorter flaps to the center
over the side flaps
and then fold the flaps with the tape to the center over all the flaps.
A tip/trick is---
You want to hold your treat holder snugly with your dominant hand
and use your other hand to fold and tuck if that makes sense.
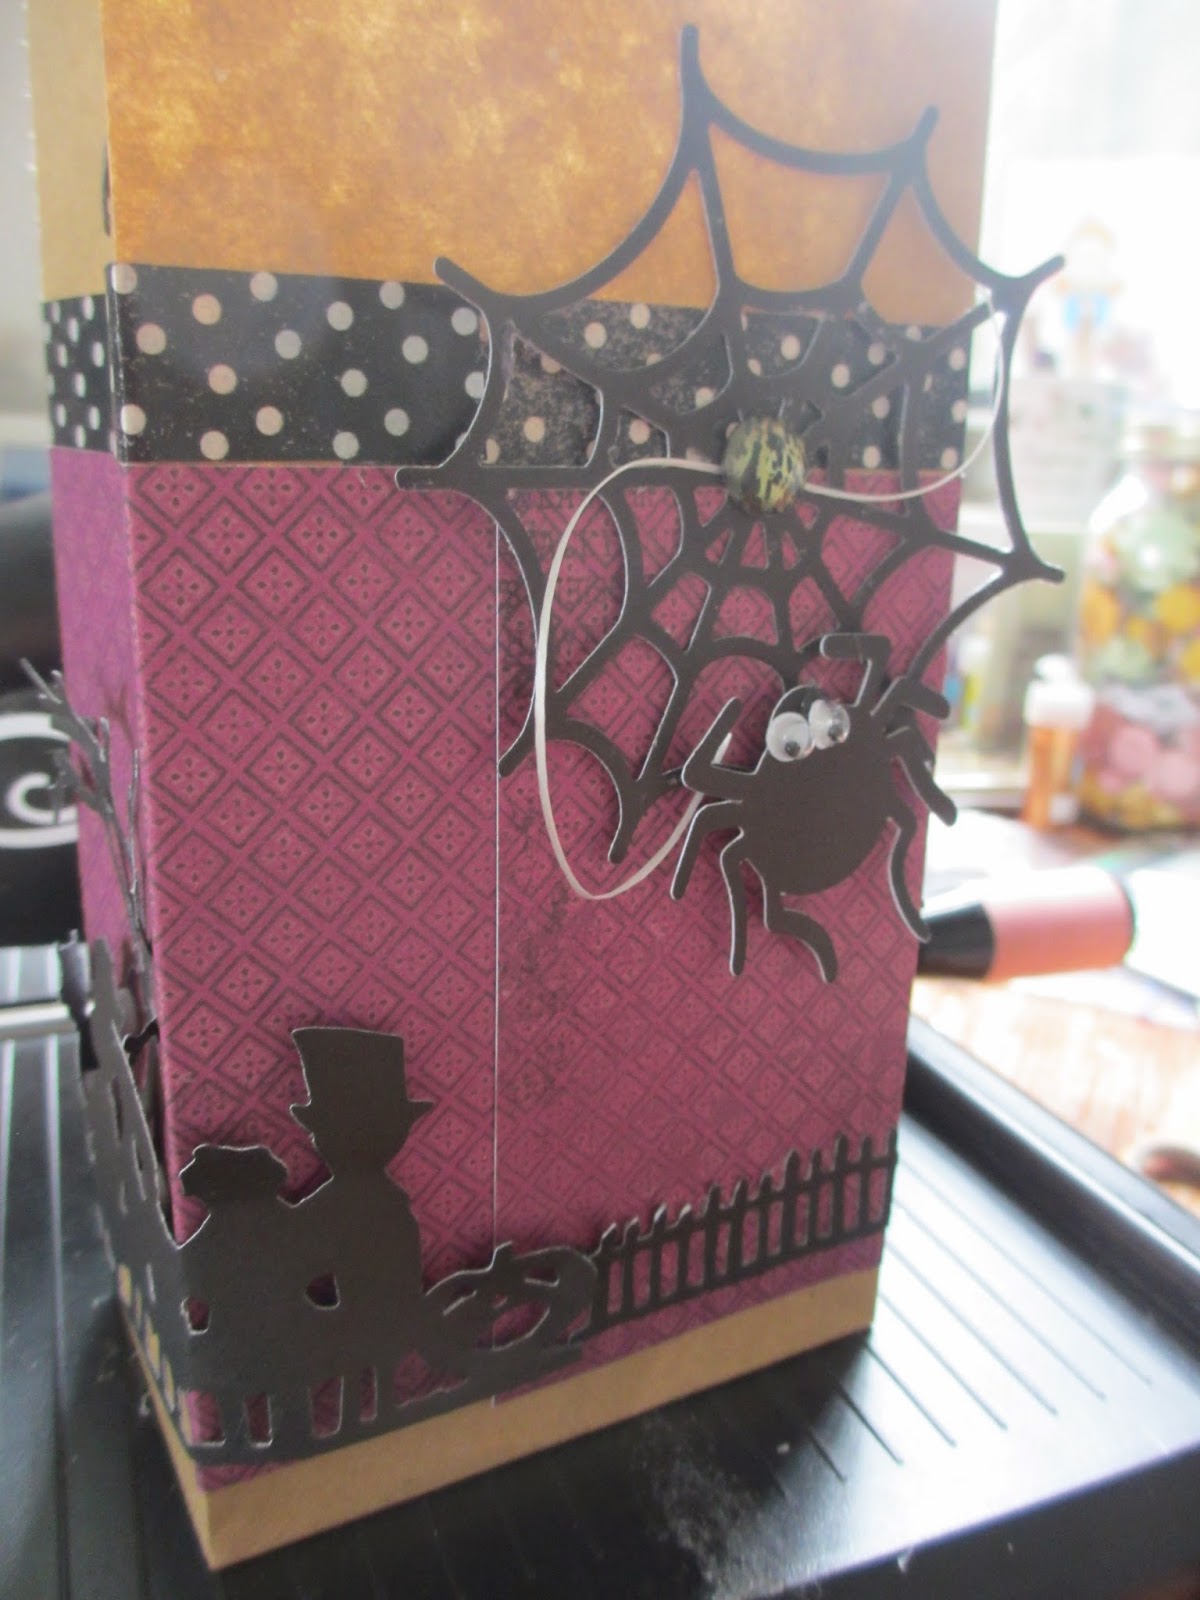
When done it should look like this:


I want to get some orange tissue paper to add to the inside of this so it
and my treat will stick up a little bit.
I can't do too scary for preschoolers
but I wanted to play with my Papertrey Ink spider webs.
The to/from tag I created in Publisher and punched out
popped up on a pop dot onto the black cardstock and
hot glued it to my treat holder.
Yes, a little delicate for little hands but that's ok.
They are more concerned about the candy then anything!
 
Don't let the steps intimidate you.
This is BY FAR one of the easiest things to put together-
size-wise, cost-wise, time wise.
This has been a fun little project that I've been able to cut all the pieces for
and then take my time assembling.
 
In between trips to the vet.
The elderly senior cat
 
aka BAD CAT (who is an extremely good patient for the vet and us!)
was uncomfortable.
Moreso than normal.
Turns out he was a constipated kitty.
A VERY constipated kitty.
Which led to the opposite problem.
So Momma has been doing vet runs,
cleaning up runs, and lots of laundry.
Including washing the cat--or at least the back-half of the cat.
Several times now.
Hopefully we are on the up side of things.
 
Two things to add here-
1) I love the Papertrey Ink spider web dies-their shipping charges ($ 7)  not so much.
Outrageous for three small dies that would fit in a small padded enve.
They came....in a huge box.
Overkill and a rip off on shipping, IMHO.
 
2) I LOVE the cat stroller!!!
I cannot say enough good things about that!
It has been a lifesaver for me---as it has rained all week---
and my fibro has flared....and running kitty back and forth
well, without the stroller I wouldn't have made it.
I got it from Amazon from a company called Discount Ramps.
It is reasonably priced (CHEAP); excellent quality; easy to assemble/use...
that carrier comes off the base to use alone-and you can take the plastic panels
out and even store it flat!
It provides plenty of protection from the weather-and has plenty of ventilation
(that top blue panel rolls back to reveal mesh opening-and the top zips down
the sides and the back of the carrier as well!
The base it light weight but STURDY with plenty of storage.
Shipping was free (I think).
Bad Cat LOVES it!
More importantly, I LOVE IT.
Great company to deal with!
 
Oh-and before I go--
here's the latest "toy" the kittens discovered:
 
Do you know what it is?
I am sure any lady whose ever cleaned a toilet
and cussed at the man who created them/designed them they way they did
knows!
It's that little button thingy that covers the bolt
that NEVER stays on!
So the kittens discovered!


Off to check on my patient
and to change laundry around.
Hope you'll try this project.
Until next time,
happy stamping and scrapping!
Blessings,


Tuesday, September 16, 2014

Long Time No Posts...

Sorry about that!
But today I do have a post!
 
I got my inspiration from


and since I am giving her credit--I hope she won't mind I posted her beautiful work...
Hilary3

I just fell in love love love with these!
 
And then there was another cute project on Pinterest that I fell in love with
that used these adorable spider webs from Papertrey Ink dies.
So I ordered a few new toys...
and I justified it that I would share them with my friend Theresa
so I threw together a small bag to stash some of the die cuts in for her.
It looked something like this---
 
So first up is my bag....my pics don`t do them justice...
here`s the front...
and here`s a tip I remembered after the fact...
when popping up colored items--like this black cutout
(Sizzix-Tim Holtz-I know-I really don`t like TH---but I loved the die....sigh)
color the edges of the pop dots with a similar colored Sharpie-
then they won`t show as much!
The moon I covered with Martha Stewarts Glow in the Dark
glitter
(I won`t buy MS punches either...!)
Here`s the side...

 again with the TH Sizzix die...
 the back

The web is from the Papertrey Ink dies-
you get three different sizes...this is the medium sized one.
The spider is cut from a CTMH Artiste cartridge I think---
it may be CTMH Art Philosophy-but I think it`s Artiste...

 and the other side...

I know someone may ask about the size of the bag...

the dp is old CTMH--Hooligans---long retired.
And washi tape along the top.
 
Ok.
So here was my other project.
I am going to be giving a little talk about
spiders and spider webs
as this guy has been in residence on our deck...
he (or she) is a writing spider.
No, I am not spider expert...
I am using this to show how we can learn
to not get caught up in ``webs``
of not so good things...
and I will be giving out some readings from some devotional books
so I made a little bookmark type thing
that the web and spider slide up and down on...
here`s one I made just with dp paper layered on cardstock
I used the middle sized die, cut a narrow enough strip
that it would slide under and then back over
the edges of the web...
12 inches long, scored at 6 inches...

 slid it into the web....
 stuck a little adhesive on the inside end of the cardstock

 and folded it in half so the web is ``sandwiched`` inbetween
and slides up and down but won`t slide off!
The bow is made out of....dental floss.
Yep.
Dental floss!
I love the look of Baker`s Twine
but I cannot jump on every  new bandwagon
and purchase every new thing out there...
trust me-it worked fine
except you want unwaxed dental floss...
the waxed was a MESS!
 
Another project or two just popped into my mind
using my web dies---
I love the Papertrey Ink dies-they work well.
They came in a timely manner.
The shipping charges---not so great.
 Three little flat metal dies....
came in a priority mail BOX at least 8`` x 8``
with two wads of paper stuffed on top of the dies
sitting on the bottom of the box.
REALLY
a padded priority ENVELOPE would have been sufficient.
And a heck of a lot cheaper.
End of rant.
 
Here`s what the babies are up to...
Sir Stirling and his favorite toy...

and Sir Sebastian with his...which is an orange pipe cleaner.
No clue-so don`t ask! lol!

 
And this is what I found the other day when I went to sweep the floor...

it is the head-just the head--of a `whittle fuzzy (TOY) mouse``!
No clue where the rest of him is...
other than...
that may be why Sir Sebastian had some tummy issues a week or so ago!
Momma also got a cat stroller...
 

from Discount Ramps via Amazon.
It is light weight-but sturdy!!!
That carrier...detaches from the stroller base by unclipping the four side bands.
The base collapses not as small as an umbrella stroller but not much bigger either!
The carrier also has two hard plastic inserts that hold the sides up while in use
but slip out so you can store it flat!
Using the ``cover`` is optional.
And there are pockets on the carrier itself
and a good sized storage area underneath
(it will hold a case of the food the I get from the vet!)
so our vet trips are going to be a whole lot easier on Momma!
We did take Poppa Cat for a walk around the block to try it out.
Can`t say he was too impressed however...
the next night when I teasingly put him in the carrier-he didn`t try to jump out!
This is a high-quality product, it came in half the time they said it would
and I believe it was FREE SHIPPING!
I can`t say enough good things about it!
Well worth the price!
 
Ok.
Off to maybe try the other projects that popped into my head.
More webs coming up!
 
Until next time,
happy stamping and scrapping!
Blessings,


Saturday, September 6, 2014

It's Raining Cats.....Baby Shower!

It really is raining today---
woke up to lots of wind, rain and more rain!
 
Then my husband came upstairs with a gift bag
that said BABY on it
and told me I had a BABY SHOWER gift.
Huh?
Me? Baby?
Uh, not possible.
But as I opened the bag he told me
it was a CAT baby shower gift!
Our neighbors sent over
a bag of treats and toy mice for
Sebastian and Stirling.
Ahhh.
That's so nice!
I will take pics and post those later
but first I realized that I had not posted the card I made and sent
for other gifts they received....
and I think those pictures are still on my iPhone. Darn!
Anyway-this is the card I made
for Theresa and Theresa (two)...

They came to see the babies a week or so ago and brought them toys
so we sent thank you notes to them.

I cannot take credit for the card template-see
Dawn's Stamping Studio for that.
It is easy-peasy and a (new!) favorite of mine to do.
I am sooo far behind-
my step son's birthday past due,
little Liam's 2nd birthday is today-and I am late for that, too.
Theresa's birthday is today as well---and yep, late again.
I'd better get off my bu----er, blog
and start crafting.
I also got a cat stroller today---
it is AWESOME and will make vet trips so much easier
on Momma....!
More on that, too!
 
Until next time,
happy stamping and scrapping.
Blessings,