Saturday, April 28, 2012

Once Upon a Time...

Well, Dawn's done it again---
I needed a card again this week
and she posted
to help me out!

One of my office volunteers
told me she and her husband are celebrating
their 37th wedding anniversary
next week.
So---
using Dawn's video
a cute couple stamp*
paper from my stash*...
a saying I came up with
and printed on
the computer...
here's the finished product...


CTMH Sweet Leaf & Crystal Blue ink colors  matched the paper colors
(even tho it's not CTMH paper!)
so I used the Red, Green, Blue codes,
bumped them up by 20 and it's a darn close match!

I made my card just a tad bigger---
of course that needs the next size up enve
but that's ok!
As usual, I pop dotted those sentiments
as well as the couple.
I just can't decide if I should sign it on the inside---
or jot it on the back?!
Hope you/they like it!

It's a dark and stormy day here
in more ways than one...
I think I will go do some organizing...
maybe take a nap later on...
fibro raging and tummy not too happy, either.

Until next time,
happy stamping and scrapping!
Blessings,
*stamp-American Art Stamps
*Paper-My Minds Eye
*Framelets-Stampin Up

Friday, April 27, 2012

My Copic Storage System....

Oh geesh---
I just logged into Blogger
and it's all DIFFERENT
God save us!
Someone got bored
and had to make changes...
sigh.

Ok.
Let's have a sip of coffee
and give it a shot.

I don't have that many Copic markers
but I needed a better system
to keep like colors together and save myself time
when I do get time to sit down and play...
I posted a link awhile back
that had an idea using the Close To My Heart
My Acrylix Storage Box(es)
that house our stamps...

and  plastic mesh
but I wasn't real crazy about it...
(the plastic mesh idea, that is--the box works perfectly!)
it  The mesh just didn't cut it for me...literally.
So
I came up with this instead...
When I got a marker recently
an empty box was used to help with packing...
 and it got my thinking...
why not make my own...?
So here's what I did...
cut cardstock at 5"x5 1/2"
score along the 5 1/2" side at 1/2", 2 1/2", 3" and 5"
then flip it and score at the 4 1/2" mark
then cut along those vertical  score lines at the bottom
just up to the horizontal score line...
this folds in to make the bottom of the box...
It should look something like this--a little less blurry, tho!
 Fold it up, tape it together
and this is the finished box...
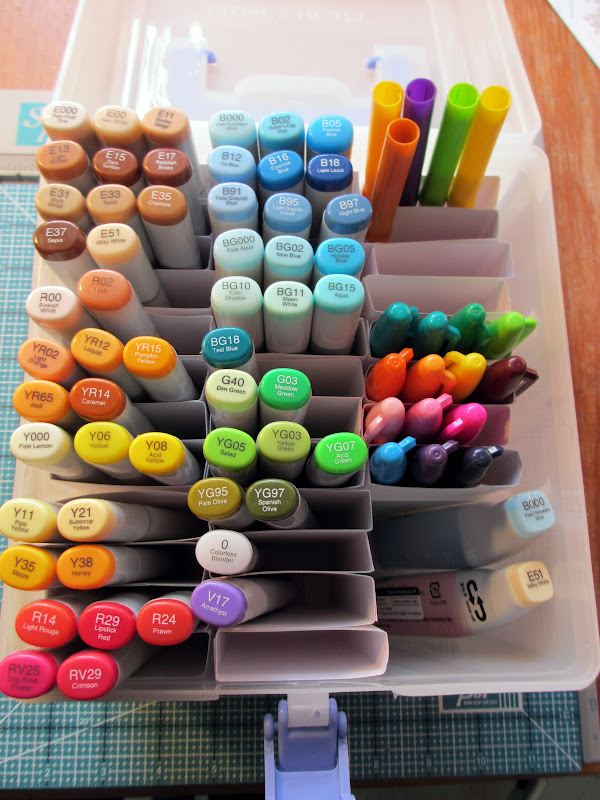
  The container, with the 3 plastic dividers,
will hold 3 boxes across, and 4 deep per division-
that's a total of what---36 boxes
and each box holds 3 markers---
so that's--wait-calculator coming out...
108 MARKERS!
WOWZIE!
I can only dream of having that many!
As you can see-I've stored my sharpies in there
along with a few other odd markers I tend to use a lot
AND left one section open to store the Copic refills
(I do have a box a I will dedicate to those (Copic refills) specifically
should my collection grow!
their customer service and shipping is top notch plus!
Their website pages are very slow loading-
but their shipping and delivery make up for it by far!
Best prices I've found, too...check them out!
And they have gift certificates---hint hint)

I also *think* the Memento stamp pad would fit there as well...
will have to check on that!
It's not a "perfect" system---as my grandmother would say...
trying tried to make a silk purseout of a sow's ear...
but it works for me for now.
The groups of three
holds the shades of the color families I go to most...
right there together...
and then I just store the box
in a basket with the color swatch booklet
that helps me keep track of which colors I have.
Handy dandy.


 Here's something that's made me smile as well...

This amaryllis was broken from the weight of the four blossoms
and one bud...
so we cut it and brought it inside...

and the bud opened as well!
That's FIVE BLOOMS on that stalk!
It's lasted since Sunday...
so, so pretty...
and
here's a pic from our front deck this week...

 Gotta love the zoom on my Canon Elph Powershot 310!
That seagull shows up--as does the sailboat!
Had I gone up on our widow's walk I could have eliminated
the neighbor's house...but I didn't.
I still think it's a pretty picture!

I am off to make an anniversary card
for a friend of mine...
they will be celebrating their 37th wedding anniversary
next week...
guess for some
"once upon a time"
really does turn into
"happily ever after..."!

Until next time,
happy stamping and scrapping!
Blessings,


Tuesday, April 24, 2012

Takin' time on Tuesday...

I had so much fun
doing my dimensional Easter card...
I thought I would play around
with a few little beach stamps I had
and a new technique I discovered
that I will share more on later...
for now...
here's what I came up with...

my lighting isn't the greatest---
but maybe your smile when you look real close at it
will make up for it!
It ALWAYS gets a chuckle once people
(ladies in particular!)
"get it"!
The sun image
is a favorite of mine--I use it a lot...
but when I got ready to do this
and was looking through my "beachy beach" stamps
I saw another sun and thought "hmmm...
maybe I will switch it out for this one...

I thought it would be cute...
but, thankfully,
I had had just enough coffee to realize that,
with the smile on the sun's face...
and her being, er, topless...
it might not be a good mix---
more like the sun leering at her!
Lol!
THAT made me laugh---
and thankful I caught that faux paux
before it happened!

Those images are all layered in that neat little shadow box
and some parts are, of course, pop dotted to give it
even more dimension!

Time to go read & relax myself!
Until next time,
happy stamping and scrapping.
Blessings,

Saturday, April 21, 2012

Sunday's Post on Saturday: Off with Her Head!

I'm back.
Roberta
and Corry, the DT Header-Upper
of all us fairies-delinquent and otherwise...
have graciously spared me the axe
and posted the tutorial I did---
it only took me THREE HOURS
to post the little action video in it---
so PLEASE watch it!
You can see the entire post here---
or fly on over to Roberta's blog
Trust me-
you're gonna want to go there anyway
to see all her awesome digi stamps
that you can get...
so-
without further ado---
here 'tis...
hope you like it:


It's Sharon--
the delinquent Prairie Fairy Design Team Member
late with my tutorial
and I bet Corry and Roberta
are about to shout
"Off With Her Head!"
I can't blame them a bit!
But maybe-just maybe
if my post & project makes them
SMILE
they will grant me a reprieve?

Let's give it a try!
For today's project--
which, I give credit where credit is due,
THE PRAIRIE FAIRY HERSELF
posted some time back...
this is merely my take on her idea...

First, you need to make an easel card---
I gotta say-I've tried twice today to do the steps and photos myself-
it's just not working so--go here
if you don't know how to make the easel base card.

Once you have that done, come back here and I will show
you what I did next.
Go ahead. I'll wait...
Ready?

You want to pick an image
and I chose
I colored her with my Copics...
and then I cut her head off!

GASP!
No-wait-I meant to do that---really...!
Watch---next we put it back on...!
Close to My Heart has come out with these great
ADHESIVE SPRINGS...
I simply put one on the back of Gillian's head
lined it up on my card so her chin came just below the cut line
on her neck...

and Viola!
Her head's back on!
Looks cute---but that still photo---
well-it just doesn't give it the "WOW" value
this idea really has...
let's give it some
See--isn't she ADORABLE?!
But wait---we can make it better
Up close and personal....
That's actually my goddaughter's head---
on Gillian's body!
How'd I do it?
I used Microsoft Publisher
(but any photo editing software will work...)
to crop a photo of her so I just had her head,
then enlarged it so it would look bigger than Gillian's body
(just the way Roberta drew Gillian!),
cut it out & attached it just like I did Gillian's head!
Too, too funny!
I cannot wait to do
I have lots of heads to add to him
as our "after our wedding" family pics were taken
at the beach--all the guys--had sunglasses on...
I know what theme birthday cards are gonna be this year!

Here's another tip---
want instant "sand" for your beach themed cards?
Simply mix 2/3 gold microbeads with 1/3 silver microbeads!
Perfect instant beach!
Liquid Glass holds them on great by the way...

So--
tell me---ya think Roberta and Corry will let me keep my head?
I hope so!
Until next time
(and yes, I will TRY to be on time!)
Happy stamping and scrapping!
Blessings,
Sharon
all papers, inks & adhesive springs by Close to My Heart

ps.
here's the inside of that easel card...I forgot to include that:

Something for Saturday...

Despite still feeling blue and struggling
(I won't lie--I am quite sad and depressed right now...)
I still wanted to get my
"end of tax season" celebration gift
to my dear friend Betsy
who's a CPA.
I was late-as usual.
I had to pick it up in Wilmington
and just didn't get there until my doctor's appt. this week.

Anyway---
I watched a great tutorial video
on a pop-up card
at

It's a new take on a pop-up card
and I gotta say-
I saw it and rushed in and tried it...
you can, too

I really, really liked it
but...
I wanted it a little bigger--
and that wasn't hard to fix at all--just cut my paper a little wider
but, if you know me,
YOU KNOW
I wanted pop dots on that pop up part...
like this...
well drat-typical for the way things are going-
you can't actually see what I popped up!
Trust me-that gal is popped up on the beach towel
as is her drink....
How'd I do that?
Instead of just cutting a straight slit with my paper laid out
the way Dawn showed you...
I folded it in half....
and then, starting 1/2" from the end,
I cut DOWN 1/4" ---I did this on both ends...
and THEN I cut across...
see...

When I open the paper back out...
I have this...
much like the opening in a Kleenex box...!
And plenty of room for that pop up part to pop---
even with Pop-Dots!

The card folds flat for mailing....
Now I will add--that I tried at first
to add a piece of white card stock to the back of the pop up part
to write a message on--
wrong!
The weight of it made it flop backwards too much.
I solved that
by putting it on the bottom of the box instead!

Now-I don't have Stampin' Ups score tool--obviously
that has tons of score lines-
the Score Pal is limited in that department--
but here's what I happened upon last week
as I was working on our groupie kits...


So.
That's it for today.
Resisting the urge to go back to bed
and pull the covers over my head...
I will try and do some flylady things
and maybe a few more cards.
It only took me 3 hours last night
just to upload my delinquent tutorial for
but I got it done!
(My apologies-again-to Roberta and Corry)
Not sure when it will post there but,
when it does,
I will post it here.

Until next time,
happy stamping and scrapping.
Blessings,

Wednesday, April 18, 2012

A Very Sad Day in OKI...

Today as I was getting in my car to go to work
a gentleman temporairly renting the house across from us
(we live in a tourist area)
stopped me and asked
if it was our cat
that got hit two weeks ago...
the same time Cocoa Puff went MIA...
(he's that beautiful boy on the right...)
as I described him through more and more tears
he kept nodding his head in the affirmative
fending off tears of his own.
My boy is gone-as is Moe's best bud.
As much as it hurts, I am grateful for him telling me.
I can stop calling and looking...
and causing more pain and confusion for poor Moe.
It's truly a sad day in OKI.
Thankfully
I have some nice photos of the both of them
taken not too long ago--weeks in fact
to remember him by.
We gave him a good life--
and I am trying to take comfort in that.
It's been a painful day--
and I may take a few before I am back...

until then,
happy stamping and scrapping.
Blessings,


Sunday, April 15, 2012

Something I Stumbled on on Sunday!

No, thankfully,
not a stumbled upon as in an accident...
but rather one of those things that was really a
"WELL, DUH----
why didn't I think of that/realize that before?!"
kind of stumbled upon.

Our groupies are doing the CTMH Footloose Workshop on the Go layout
for our class Tuesday night.
This particular layout
doesn't hold many photos...
some of our gals like a lot of photos on page
so my first effort was to incorporate more and larger photos.
I did that.
Then today
since I have an extra paper pack
I said well--let me do the layout like it shows in the instructions...
(as shown above...)
so I was working away...
and I had my base paper down on this...

 I LOVE my Score Pal---
and the fact that that mat fits right in there and you can do
just about anything on it...well!
And then I discovered hey-I can MEASURE my layout pieces
just by using the Score Pal...
The dp strip--goes right at 3"---line it up at the top
tape it down, slide that base page up a hair
and you can line it up the exact same way at the bottom!!!

That green mat?
In the pic below--
it goes at 1 1/4"---
gee-look at that-match it up-stick it down
AND
because the base page is flush with the side of the Score Pal-
just match up your layered piece as well-so it's all straight!!!
OH YEAH!
Doing my happy dance here--but wait---
IT GOT BETTER!
I had to line up a title panel--a PIECED title panel...
so ok-I have marks on either side---but I need a little help with the middle
that a little  over 12" ancient ruler I had...
sat right across that Score Pal---
and gave me a "line" to lay my letters along...
GO ME!!!
The Score Pal just took the pain out of measuring!
Seriously-I just stumbled upon this!
If you knew it-wait, wait-don't tell me!
(really-I only listen to Garrison Keillor-Prarie Home Companion on NPR!
well-and sometimes Fatback Folk Hour!)
Don't burst my bubble!
I am so psyched
I am off to do the companion layout!

Until next time-
happy stamping and scrapping!
Blessings,


Saturday, April 14, 2012

Sponge Daubers on Saturday...

After I finished prepping the
Close to My Heart Footloose Kits
today
I decided that since we were going to be stamping our own
multicolored embellishments like these
where we have to layer on--or DAUB on--different ink colors
to the stamp-
I decided that having one set of daubers for an entire group
(we're talking 6 ladies but still...)
just wasn't going to cut it time wise.
Nor was it cost effective for me to purchase 4 daubers per person
at the cost of $ 1.31 each plus shippingx6---we're talking (b/s)
-$ 31.44!
Just not happening people!
Not after I found on the web
and I apologize-I can't remember who or where....
how to make your own
out of make up sponges and PVC pipe!
Hubby is a handy-man diy guy
so the pipe we had on hand
(he cut me---38...I am gonna guess it was maybe $3 worth of pipe...).
Now I gotta say--
it wasn't pretty.
We're talking plumbing pipe people-unused but still...
it had been downstairs in his stash-outside--and had pipe info stamped on it
and is a funky off white color.
So after he cut these--gonna say the pipe is 3/4" diameter
and about that long...guesstimating
 I sanded the rough edges down
I washed them off good
dried them off and went to work with some
leftover CTMH Wings dp and Modge Podge. 
I had cut the paper into small strips--used about 1/2" of a 12x12 sheet...
I put a layer of MP on the pipe, wrapped the paper around the pipe,
and coated the outside with more MP, trimmed off any excess paper
 and left them to dry.
Once they were dry, I carefully stuffed them with those
triangular make up sponges-one per dauber
working to make sure that it squished up so that the top was smooth
(no sharp edges from the sponge poking out...)
Here's what they look like


The best part is---
the sponges can easily be changed out..
and they were basically free---
I paid $ 1.37 for 37 sponges!
Everything else I had on hand...!
They are a bit wider than what we sell...

 but hey---that doesn't really matter!
Not perfect-but quite usable
and an easier option to covering them---
had I wanted to drive an hour round trip
and spend a little more money
would have been that pretty decorative
DUCT TAPE!
Or that wasi---or whatever it's called--tape! ; )
Oh yeah-that would have cut down on the time
by tons!
But-it was fun. They are pretty.
Solved my situation for class!

Now-
to go make my sample pages!
I'll post those tomorrow maybe...
Until next time
happy stamping and scrapping!
Blessings,